Stormwater Bump-Outs


StreetBumpout-Large.jpg


What are they:

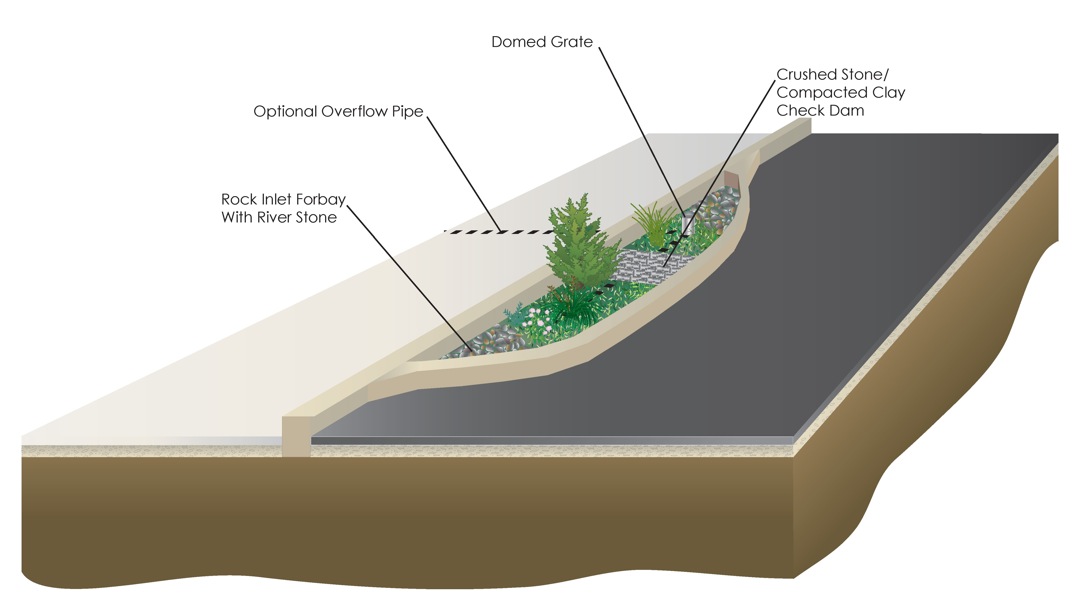
“A stormwater bumpout is a vegetated curb extension that protrudes into the street either mid-block or at an intersection, creating a new curb some distance from the existing curb. A bumpout is composed of a layer of stone that is topped with soil and plants. An inlet or curb-cut directs runoff into the bumpout structure where it can be stored, infiltrated, and taken up by the plants (evapotranspiration). Excess runoff is permitted to leave the system and flow to an existing inlet. The vegetation of the bumpout will be short enough to allow for open sight lines of traffic. Aside from managing stormwater, bumpouts also help with traffic-calming, and when located at crosswalks, they provide a pedestrian safety benefit by reducing the street crossing distance.”


Advantages/Benefits:

-shorten crossing distances on streets (safer for pedestrians)
-gives perception of road narrowing so drivers slow down in this area
-reduce stormwater overflow
-add curb appeal (make area nicer and increase its property value)


Disadvantages/Challenges:

-adding one means changing the official City Plan (require ordinance/letter from Streets Commissioner/public hearing)
-finding a good place to put them so they don’t obstruct normal traffic flow (esp. For emergency vehicles)
-placing them in an area that would not negatively affect underground utilities
-keeping the bump out clean (picking up trash thrown into the vegetation

How they work:

  1. Stormwater from roadway flows into bumpout
  2. Water ponds over the soil where it will gradually be absorbed and filtered through various subsrates
  3. The native plants filter and transpire the water as well before the water is stored in the stone or other storage media underneath
  4. A domed riser is directly connected to the storage area in case of really heavy rainfall so water is taken into the ground faster
  5. Once it’s filled, the water can overflow safely into the inlet and into the sewer


Comments

Popular posts from this blog

What We've Been Doing From Lab 4 to Lab 5

This week, we decided to focus on familiarizing ourselves with SketchUp, Philadelphia's Native Plants, and the area we are renovating. In Sketchup, we created the building, which is the basis of our area. That was difficult because we had to place each window on individually, but it helped us to gain a better understanding of how to use Sketchup, which we then used to created the right-of-way bioswale and sidewalks. Ina created a thread detailing the drainage in our area, and Carolina posted about the deterioration of the drain in the area we are in. Unfortunately, we didn't correctly draw the bioswale, so we will be re-doing it, but now we know how to create GSI's in SketchUp. Below are some pictures of our progress!

What We've Been Doing From Lab 6 to Lab 7

Hey guys! This week, we've been hard at work on the final report draft, so we have not had much time to work on the design. However, we were able to create a piping system extending into the sewer grate, and we taught ourselves how to create curved pipes in SketchUp. Along with our progress, we conducted more research on native Philadelphian plants, and implemented some of the ones we could find as 3-D models in the design. This week, we also started to conduct runoff calculations for our problem area. Next week, we will focus exclusively on creating the drainage area map, as well as doing calculations for the drainage, and we will complete the addition of the native plants into the design. Below are some pictures of our progress!

What We've Been Doing From Lab 7 to Lab 8

Hey guys! This week we've been working on putting the finishing touches on the 3D model, such as adding the beehive structure and pipe to the stormwater bumpout, taking pictures of the structure to be used in the engineering drawings, finishing the drainage area map in AutoCAD, and adding appropriate plants in all of the GSIs. Next week, we hope to work more on the final draft, to finish the drainage area map, to create the presentation, and to finish the calculations. Thanks for following our development, and below are some pictures of our progress!